
Last friday, I took part in the first part of a film photography workshop celebrated in Papel Salado; The aim of this part is to develop a BW 35mm film, with a real practice of the whole process. Here is a summary of the session.
Remove the film from the film cassette
When rewinding the film in the camera it is preferable not to do it completely and leave a small part out of the film cassette. If it is all inside the chassis, it is recommended to use a film leader retriever to take a few centimeters:

Basically, the first tab is slid and inserted into the reel, the film is rewound until a small noise is heard, then the second tab is inserted, and you have to pull out to extract the tip of the film.
Here is a video tutorial about how to do it:
Identification of exposed films
Bend the tip of the film to know that it is exposed. With a permanent pen we write the information of the capture (date and camera), and keep it in the fridge until it can be developed. It can also be stored in the freezer.
Loading the film in the spiral reel
First part (Light on):
Cut the end of the film so that it is straight and round the corners.
With the spiral placed in front of us, the entrance of the black tube (funnel) through which liquids are introduced must be on the right side; we have to hold de spiral with both hands; we keep the left hand still while moving the right hand in order to introduce the film in the reel.
Insert the film until it engages the two small balls in the entrance of the reel, and give a small pull to check that it is right fastened.
Arrange the necessary material on the table so that everything is at hand when we turn off the light: spiral with the start of the film placed, tank, tank lid and scissors.
Second part (Light off):
Introduce the film step by step in the spiral. The reel is released from the cassette and with the right hand we move the spiral forward 3-4 times to introduce the film in the spiral; we must be aware of the noises. When we notice that no more film comes out, we give a little tug to check that there is no more film in the chassis and cut with the scissors. We give a couple of additional advances to the spiral to make sure that the whole film is perfectly place into the spiral.
Introduce the spiral in the tank, with the liquid introduction tube (it is on our right hand) upwards.
Close the tank, making sure the joint is uniform: run your finger underneath to check.
Now you can safely turn on the light!!
Development process
Preparation of the developer according to the characteristics of the film and the developer. In this case we use FOMADON R09:

This information can be obtained in this web site (although FOMADON R09 doesn’t appear):
https://www.digitaltruth.com/data.php?doc=filmdevsabc
This is FOMA information, where the development times are reference for a water temperature at 20ºC
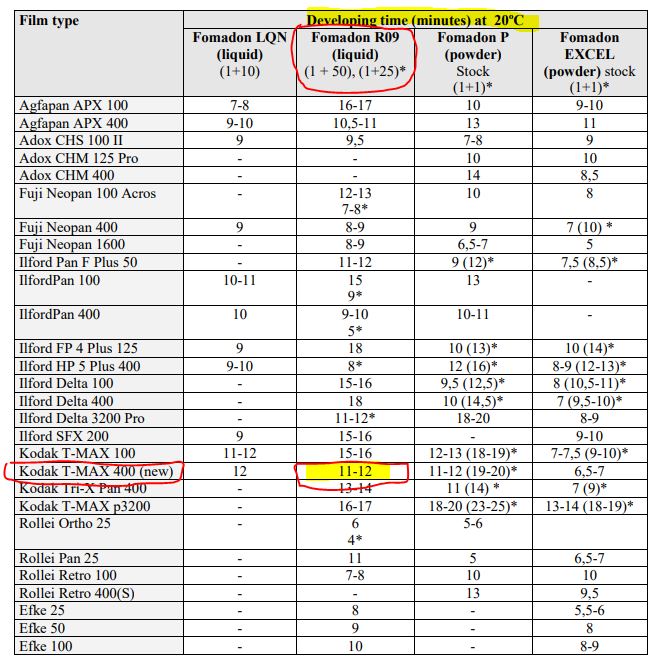
This tells us that for 20ºC the ratio is 1:50 (1ml of developer for 50ml of water) and the time for the KODAK TMAX 400 film between 11-12 minutes:
The next think we should do is to know the water temperature (At higher temperature, time is reduced) and calculate the time acording to this formula:
https://www.digitaltruth.com/devchart.php?doc=timetemp
To calculate the amount of developer, if the tank has 300 ml, to calculate the amount of developer, we apply a rule of three:
300 —-> 50 ; x —-> 1 then x = 300 / 50 = 6 ml
Prepare the developer in a test tube: 300ml low mineralization water + 6ml developer, and control the temperature:


Prepare in another test tube the stop liquid (300ml): 1 + 19

Prepare a timer for time control and prepare an agitation guide.
Prepare a cloth to put underneath the tank.
Prepare the fix mixture in a bottle (1 + 5); with a label to mark the uses that remain available:


Process:
Open the tank cap and pour down the developer.
Start the stopwatch
Shake following a regular pattern during the first minute. After each shaking, hit twice against the table to eliminate bubbles.
Follow the agitated pattern. 10 seconds of each minute (this is also usually indicated by the developer’s manufacturer):
0 – 1:00 Shake
1:01 – 1:49 Rest → wash the developer tube and prepare the fixer mixture
1:50 – 2:00 Shake
2:01 – 2:49 Rest
2:50 – 3:00 Shake
3:01 – 3:49 Rest
3:50 – 4:00 Shake
4:01 – 4:49 Rest
4:50 – 5:00 Shake
…
9:01 – 9:49 Rest
9:50 – 10:00 Shake
10: 01-10: 10 Empty developer in recycling bin
Add the stop liquid and shake for 1 minute.
Empty the stop liquid in the bottle and add the fixer.
Shake regularly for 8 minutes (remember to hit firmly to remove bubbles).
Empty the fixer in the bottle and write a check mark on the bottle.
Now you can open the tank and wash the film leaving the water running for about 20 minutes.


Finally, the humidifier is added and left a couple of minutes in the water before removing the film and hanging it to dry.
References:
http://nathanjones.com/articles/developing-film-3/


Leave a comment